Import values into a value table
Typing a value table row by row is bearable at twenty pairs and no longer at two hundred. Import values takes over many pairs at once — from a file or from the clipboard — and shows you the outcome before you apply it.
The running example is the table Mengeneinheiten Webshop from the guide Create a value table. It already knows ST, KAR, PAL, PK, and DS. The web shop has since added four more units, and KAR is in the input once again.
What you need
- An existing value table. Open it from the Value Tables page.
- The Configuration — Mapping permission at the Full level. Without it the detail view is read-only and Import values is absent.
- The values as two columns per line — source value and target value — either as a file (CSV, TXT, or TSV, at most 5 MB) or in the clipboard, ready to paste.
The import only changes the draft. Until you activate it, no run translates with the new values.
Prepare the input
Every line carries a source value and a target value, separated by a tab, a semicolon, or a comma. Xchange detects which one applies — the character occurring in the majority of the lines wins. So do not mix them within one input.
ROL;Rolle
BUND;Bund
SAC;Sack
KAR;Karton
;Beutel
_default;Stk.
The last line is a special case: the source value _default creates no entry but sets the table's fallback value — the value a run uses when no entry matches the source value.
The fourth unit has lost its source value in this input — the kind of typo that happens while assembling one. Xchange skips that line and reports it in the preview; further down is how you spot it.
Import
- Open the dialog. In the entries header, click Import values.
- Hand over the input. Choose a file or paste the text directly. A chosen file ends up in the same text field — so you can still read and correct its content before importing.
- Choose the behaviour. Merge keeps the existing entries: a source value the table already knows is overwritten in place, new ones are added. Replace discards all existing entries and the fallback value. In the example, Merge is right —
ST,PAL,PK, andDSare meant to stay. - Read the preview. Above the preview sits the summary Entries · Skipped · Merged. In the example: eight entries after the import, one skipped line, one overwritten entry —
KAR, which the table already knew. - Apply. The button at the bottom states how many lines will be taken over. Xchange then saves the result into the draft automatically, like any other change.
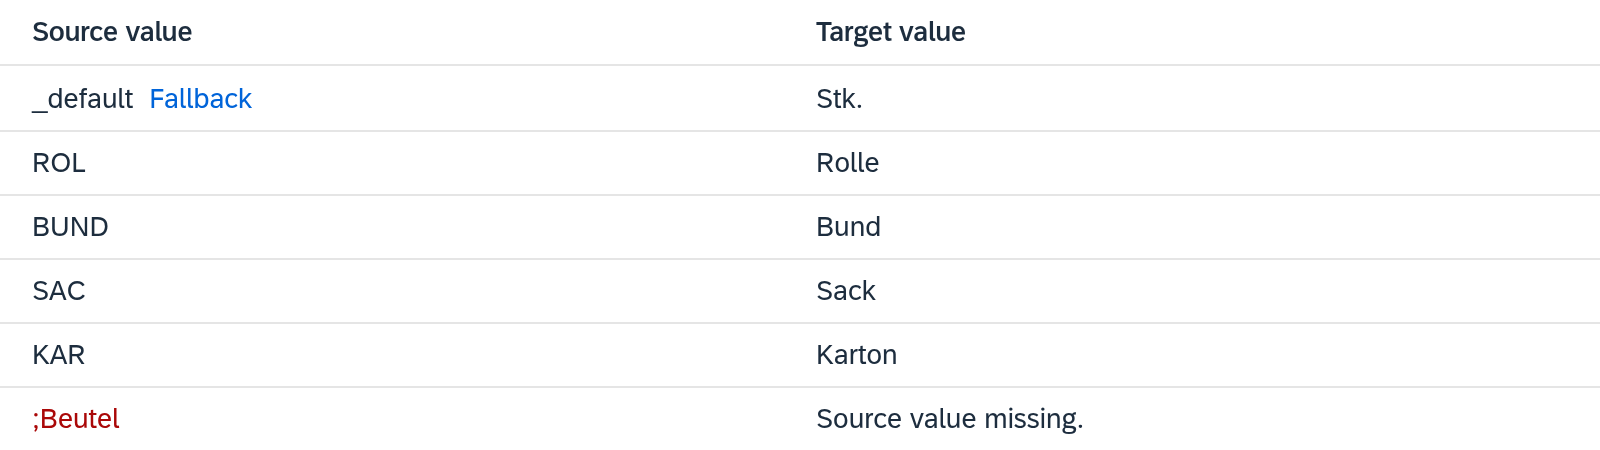
When a line cannot be read
A line without a delimiter, without a source value, or with more than two columns appears in the preview in red with the reason beside it, and is skipped. It does not hold up the import — the remaining lines go through.
That is convenient and easy to miss: the summary states the number of skipped lines, but nobody asks you about it. Read that number before you confirm. If it is higher than expected, correct the input in the text field and check the preview again rather than repeating the import.
Activate
The imported values only take effect once you activate the draft. The full procedure is described in the guide Activate configuration changes.
What comes next
Once the table is in place, put it to work as a transformation in a route's mapping — the second part of the guide Create a value table and use it in a mapping shows where.